Shop Tip- How to Select A Front Derailleur
By Gwen, Service Supervisor
This series of shop tips over the past several months was all about creating a basis for more in-depth knowledge. Whether you’re working on a bike you already own or preparing to buy a new one, it’s very helpful to be familiar with all the different types of components. Knowing their names, their uses and their limitations can help you be prepared to ask the right questions and make well-informed decisions.
In our previous shop tip, Gwen provided information on the types of shifters. In this tip, she will describe how to select a derailleur. It may be helpful to review Gwen’s overview of derailleurs from earlier this summer.
There are three main factors which you will need to consider when selecting a front derailleur (or determining if the front derailleur on your bike is correct).
1) Clamp Diameter or Interface
Front derailleurs can be mounted to a bicycle frame using one of three basic methods. There are 3 common tube diameters around which a front derailleur can clamp, 2 types of bolt-on interfaces, and a type of derailleur which attaches at the bottom bracket.
- “Clamp-On” front derailleurs come with a clamp of a specific diameter, which are meant to fit around different kinds of bicycle frames. Most frames will be either 28.6mm, 31.8mm or 34.9mm in diameter, but certain bikes made before the 1980s will have a slightly smaller tube diameter. For the three most common diameters, there are spacers which allow larger derailleur clamps to be compatible with more than one size. If you plan on using spacers, you will need to make sure that you have the correct spacer and clamp for your frame.
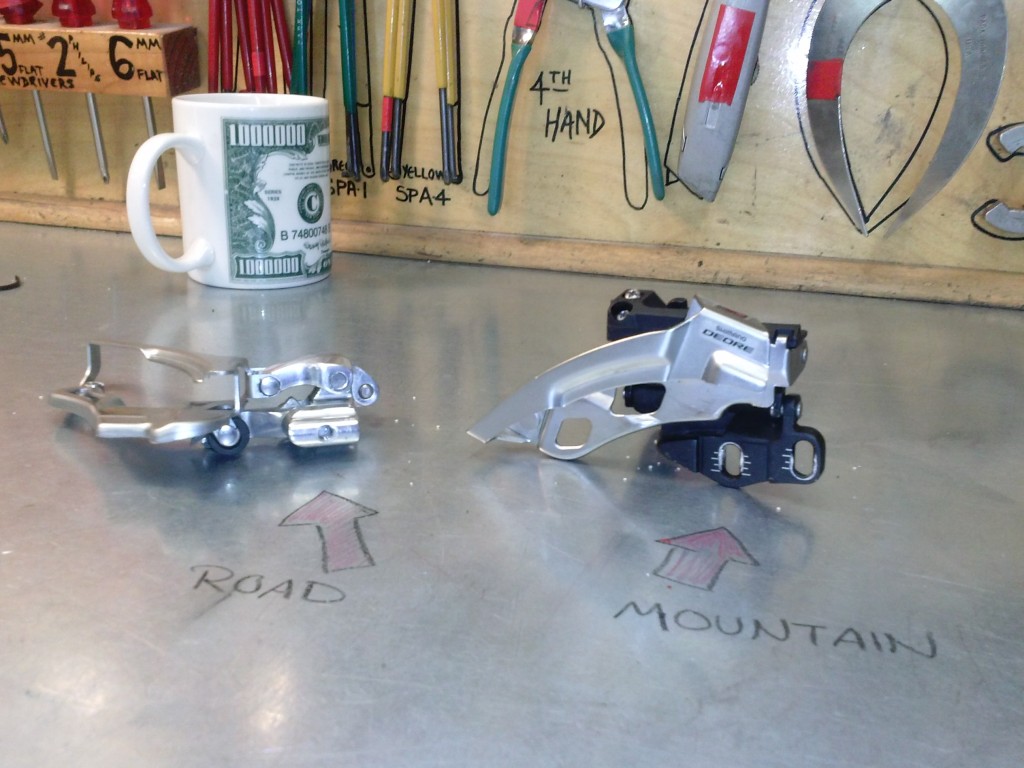
- “Braze-On” front derailleurs bolt into a tab which brazed on the bicycle frame. There are two different types of braze-on front derailleur interfaces: one is commonly found on road bikes, the other on mountain bikes. The interfaces are different enough that a quick visual inspection should allow you to determine which type of interface you will need.

- “E-Type” front derailleurs are made to be clamped between the frame and the bottom bracket. This type is less laterally adjustable than the others. Each model can only be paired with the specific chainring sizes it was designed to work with. Fortunately, Shimano is the only company which makes E-Type front derailleurs. Their website provides all the technical specifications for past and current models based on the 6-digit product identification number which is printed on all of their components. Once you’ve located this number (it should look something like “FD-6600”), you can search for the technical documents for it on their website: http://si.shimano.com/.
2) Compatibility With Your Crankset
Front derailleurs are made to either work with double or triple chainring sets. Derailleurs with broader cages are designed to work with sets of three chainrings and those with narrower cages are designed to work with sets of two chainrings.

In addition, front derailleurs are made for either 7, 8, 9 or 10-speed chains, but they can often be used interchangeably. If you are using a different chain than your derailleur was made to work with, the degree of adjustment you can expect will be lower than with a matched set. And sometimes the two will not work together at all. If you’re unsure whether a certain derailleur will work with a certain size of chain, bring it in to your local bike shop and a mechanic should be able to tell you what to expect.
3) Cable Pull Direction
Some front derailleurs are designed to work with cables which pull upwards from above the derailleur, and some work with cables which pull downwards from below. They are called “top-pull” and “bottom-pull” respectively. Some work either way and are called “dual-pull”. If you actuate the derailleur with your hands, you will be able to tell which direction the pinch bolt (the bolt that holds the cable in place) moves as the derailleur swings outwards and inwards. Locate the cable stop or routing on your bike frame through which the derailleur cable will run. Ensure that the front derailleur will work with the position of the cable stops or routing on your frame.

Top Pull

Bottom Pull
Other Considerations
You will also want to make sure that your front shifter is working properly. If it is an indexed shifter, it should click three or four times as you push its lever back and forth. f it is a friction shifter, the lever will simply need to glide back and forth freely and stop completely at one end of its range. With either type of shifter, it’s important to make sure that the shifter will hold the cable in place as you ride.
There are two easy ways to test a shifter, whether it’s on your bike or off. The first is to set the shifter in its lowest gear, grasp the cable tightly with one hand while shifting up with the other. If the cable slips due to the pressure you are applying, you may want to service or replace your shifter. And if you have an indexed shifter, you will also want to make sure that it has the correct number of “clicks” and is pulling cable with each click.
Below is a list of factors which would prevent a front derailleur from performing correctly.
- If the crankset and bottom bracket aren’t compatible, the crankset may sit either too close or too far from the frame. This can prevent the derailleur from being able to reach the highest or lowest gears, no matter how far out the limit screws are set. If you are having problems with reach of your front derailleur, ask at your local bike shop to see if someone can inspect your chain-line to make sure that it is within tolerances.
- If the pivots are loose, the derailleur may not move with precision. “Sloppy” shifting will be the result. Wiggling the derailleur with both hands will allow you to determine if its pivots are loose. The more the derailleur moves back and forth, the looser the pivots are. Loose pivots cause the most problem with indexed shifters.
- If the derailleur is bent or the cage is cracked, it will not be able to move the chain from one chainring to another easily or at all. Be sure to inspect your derailleur for damage before installing it and each time you want to adjust it.
Stay tuned, our next shop tip will be all about how to adjust a front derailleur.